printer73x’s documentation
A CNC printer for binary images
| Author: | Pedro I. López [dreilopz@gmail.com] |
|---|---|
| License: | Creative Commons Attribution 3.0 Unported License |
| Date: | November 02, 2012 |
printer73x.
Introduction
printer73x is a CNC system for printing binary images. printer73x was developed for the school courses 734 - PROYECTO DE IMTC I and 735 - PROYECTO DE IMTC II (spanish for mechatronics project) at FIME UANL. printer73x has only been tested on Windows XP and Fedora 15 but will work on Windows Vista, Windows 7, Mac OS X, and most Linux distributions. The software is written mainly in Python and MATLAB.
printer73x 1.0 is released for educative purposes. I’m (Pedro I. López) currently trying to persuade the mechanical design team to publicly release the documentation for the structure (printerm), but for the moment this distribution doesn’t include it.
The following people were involved in the development and funding of printer73x.
Mechanical design and implementation:
- Ulises Acosta Muñiz
- Javier Longoria
- Gregorio Reyes Banda
- Abraham Arturo Silva Flores
Software and electronic design and implementation:
- Iván García González
- Pedro I. López [dreilopz@gmail.com]
The sections Physical Components and System requirements list symbolic names of different elements of the systems that are used throughout the document.
Note
In this document the standard Unix-like path notation is used.
Note
Every path is relative to the project’s distribution main directory.
System requirements
Hardware and software requirements.
- Supported operating system:
- Windows XP (tested)
- Windows Vista
- Windows 7
- Most Linux distributions (tested on Fedora 15)
- Mac OSX
- 1 USB port.
- MATLAB >7.0.
Design
As stated in the section Introduction, printer73x is a project developed for a school course. The following are factors influencing the project’s design and implementation:
- High priority
- Low implementation time.
- Portability across different systems.
- Simple design.
- Low cost.
- Low priority
- Extensibility.
- Ease of use.
- Ease of installation.
- Tight integration of the subsystems.
printer73x is CNC printer that reproduces an image selected from the PC.
The machine tool is a pen that is translated across the 3 axes of the
machine. The  and
and  axes form a finite plane in which
the pen translates, with each position equivalent to a pixel location in
the image. In any position the pen is able to translate across the
axes form a finite plane in which
the pen translates, with each position equivalent to a pixel location in
the image. In any position the pen is able to translate across the
 axis to print color in the pixel location.
Stepper motors are used to drive the translation across the
and axes. There are only two possible positions the pen can
have across the axis (either print the present pixel or not),
so in this case a servomotor is enough to move the pen up and down in
any pixel location of the image/plane. So the machine uses 1 stepper
motor for each and axis, and 1 servomotor for the
axis. The printed image is binary because a single pen is
used to print the whole image, resulting in 2 possible colors: the
surface color and the pen color.
The project is split in the following subsystems:
- PIMG
- Processing IMaGe, routines that process the input image to adapt it to printerc requirements. It outputs a modified image which the user manually inputs to printerc.
- printerc
- This the computer program that actually drives printerm through mcircuit. With its interface the user chooses the image, and starts the printing process by continually sending commands to printerm. Connected to mcircuit through USB.
- mcircuit
The main circuit, contains the microcontroller and motor drivers. Its subsystems are:
MM12 Mini Maestro 12, the digital controller. Connected to MCB through regular electrical wire.
MCB Main Connection Board, supplies electrical connectors to plug the motors and the MM12.
Connected to printerm through the motors.
- printerm
- This is the physical machine, capable of motion across 3 axes. Its
machine tool is a pen which can positioned at some point in a plane
( and axes) and print a pixel moving the pen in the
Z axis.
System diagram is a diagram of the whole project, see section Subsystems for details.
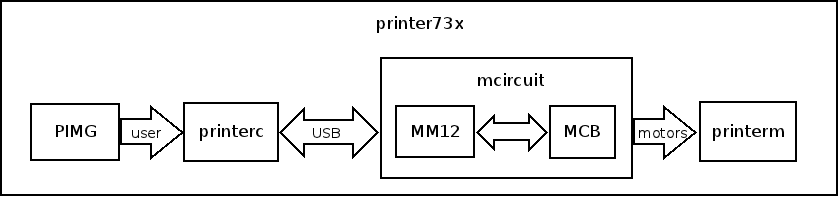
System diagram
Specification
printer73x can print raster images. printerm the actual machine, has a limit on the characteristics of such image, but PIMG takes care of adapting the original input image for the rest of the process.
Subsystems
System diagram shows how the subsystems interact. PIMG adapts the image to fulfill printerc’s image requirements. Then printerc uses the image to drive printerm through mcircuit.
PIMG
Processing IMaGe, routines that process the input image to adapt it to printerc requirements. It outputs a modified image which the user manually inputs to printerc. Implemented with MATLAB. It may not be necessary to use PIMG if the original image already fulfill printerc’s image requirements.
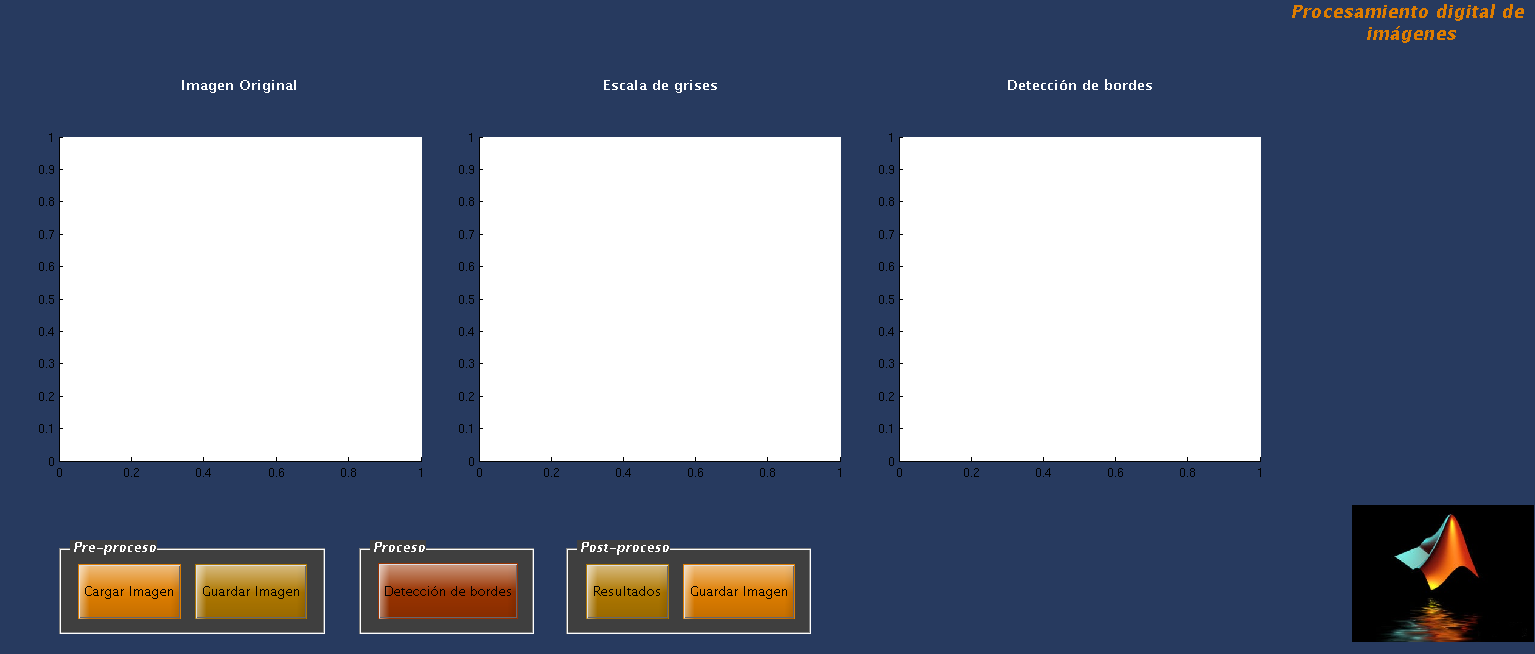
PIMG’s screenshot.
printerc
Numerical controller for the printer73x system.
printerc is an interactive command line interface for the numerical control
of the printer73x system. printerc drives printerm through mcircuit;
printerc stablishes a serial connection with mcircuit, and mcircuit is coupled
to printerm through the motors. mcircuit (actually MM12, its subsystem) loads
in its memory the routines that correspond to the translations across the
, and axis, and then printerc execute these
routines in order to produce the trajectory of the tool printing the image.
- class printerc.Getch[source]
Gets a single character from standard input. Does not echo to the screen.
References
[GETCHRECIPE] http://code.activestate.com/recipes/134892/
- printerc.INTRO_MSG = '\n**printerc**\n\nWelcome!\n\n'
Welcome message for command line interface.
- printerc.LOGF = 'log.rst'
Path to the log file.
- printerc.MM12_AXES_CHANNELS = {'Y': {'dir_negative': 5600, 'dir_channel': 2, 'dir_positive': 6800, 'step_channel': 3}, 'X': {'dir_negative': 6800, 'dir_channel': 0, 'dir_positive': 5600, 'step_channel': 1}, 'Z': {'on': 940, 'off': 1580, 'channel': 4}}
Configuration of the MM12 channels for the servo and stepper motors outputs.
- printerc.MM12_SCRIPT_INIT = '{servo_acceleration} 4 acceleration\n{servo_speed} 4 speed\n'
MM12 script initialization.
- printerc.MM12_SCRIPT_RUNNING = '\x00'
Byte value that the MM12 returns when the script is running.
- printerc.MM12_SCRIPT_STOPPED = '\x01'
Byte value that the MM12 returns when the script is stopped.
- printerc.MM12_SUBROUTINES = {'Y-p': {'subroutine_body': 'sub y_neg_pulse\n 5600 2 servo # set direction\n 5600 3 servo\n {delay} delay\n 6800 3 servo\n {delay} delay\n quit\n', 'subroutine_id': 4}, 'Y+p': {'subroutine_body': 'sub y_pos_pulse\n 6800 2 servo # set direction\n 5600 3 servo\n {delay} delay\n 6800 3 servo\n {delay} delay\n quit\n', 'subroutine_id': 5}, 'Z-': {'subroutine_body': 'sub z_position_off\n 6320 4 servo\n begin\n get_moving_state\n while\n # wait until is is no longer moving.\n repeat\n 75 delay\n quit\n', 'subroutine_id': 8}, 'Y-P': {'subroutine_body': 'sub y_neg_pixel\n {{ntransitions}}\n 5600 2 servo # set direction\n begin\n dup\n while\n 5600 3 servo\n {delay} delay\n 6800 3 servo\n {delay} delay\n 1 minus\n repeat\n quit\n', 'subroutine_id': 6}, 'X-P': {'subroutine_body': 'sub x_neg_pixel\n {{ntransitions}}\n 6800 0 servo # set direction\n begin\n dup\n while\n 5600 1 servo\n {delay} delay\n 6800 1 servo\n {delay} delay\n 1 minus\n repeat\n quit\n', 'subroutine_id': 2}, 'X+p': {'subroutine_body': 'sub x_pos_pulse\n 5600 0 servo # set direction\n 5600 1 servo\n {delay} delay\n 6800 1 servo\n {delay} delay\n quit\n', 'subroutine_id': 1}, 'Z+': {'subroutine_body': 'sub z_position_on\n 3760 4 servo\n begin\n get_moving_state\n while\n # wait until is is no longer moving.\n repeat\n 75 delay\n quit\n', 'subroutine_id': 9}, 'X-p': {'subroutine_body': 'sub x_neg_pulse\n 6800 0 servo # set direction\n 5600 1 servo\n {delay} delay\n 6800 1 servo\n {delay} delay\n quit\n', 'subroutine_id': 0}, 'X+P': {'subroutine_body': 'sub x_pos_pixel\n {{ntransitions}}\n 5600 0 servo # set direction\n begin\n dup\n while\n 5600 1 servo\n {delay} delay\n 6800 1 servo\n {delay} delay\n 1 minus\n repeat\n quit\n', 'subroutine_id': 3}, 'Y+P': {'subroutine_body': 'sub y_pos_pixel\n {{ntransitions}}\n 6800 2 servo # set direction\n begin\n dup\n while\n 5600 3 servo\n {delay} delay\n 6800 3 servo\n {delay} delay\n 1 minus\n repeat\n quit\n', 'subroutine_id': 7}}
Structure that builds and identifies the MM12 script subroutines.
- printerc.SRV_SIGNAL_CHANNEL_TARGET_OFF = 940
- axis servo motor pulse width in units of quarter-
 that enables printing (moves the tool down).
- printerc.SRV_SIGNAL_CHANNEL_TARGET_ON = 1580
- axis servo motor pulse width in units of quarter-
that disables printing (moves the tool up).
- printerc.STEPPER_CHANNELS_TARGET_OFF = 5600
Target value in units of quarter-
that drives the stepper
channels low.
- printerc.STEPPER_CHANNELS_TARGET_ON = 6800
Target value in units of quarter-
that drives the stepper
channels high.
- printerc.STEPS_PER_PIXEL = 90
Number of steps the stepper motor needs to translate 1 pixel across the
or axes.
- printerc.SUB_SERVO_TEMPLATE = 'sub {name}\n {position} {channel} servo\n begin\n get_moving_state\n while\n # wait until is is no longer moving.\n repeat\n 75 delay\n quit\n'
Template for the MM12 script subroutine that drives the servo motor.
- printerc.SUB_STEPPER_PIXEL_TEMPLATE = 'sub {name}\n {{{{ntransitions}}}}\n {dir} {dir_channel} servo # set direction\n begin\n dup\n while\n {off} {step_channel} servo\n {{delay}} delay\n {on} {step_channel} servo\n {{delay}} delay\n 1 minus\n repeat\n quit\n'
Template for the MM12 script subroutines that drive a stepper motor in units of pixels,
- printerc.SUB_STEPPER_PULSE_TEMPLATE = 'sub {name}\n {dir} {dir_channel} servo # set direction\n {off} {step_channel} servo\n {{delay}} delay\n {on} {step_channel} servo\n {{delay}} delay\n quit\n'
Template for the MM12 script subroutines that drive a stepper motor in units of low-to-high transitions, for a precise but slow translation.
- printerc.TRANSITIONS_PER_PIXEL = 180
Number of low-to-high transitions the stepper motors need to translate 1 pixel across the
or axes.
- printerc.TRANSITIONS_PER_STEP = 2
The board sets the microstepping format with the jumpers MS1 and MS2. Use the following table to set this constant:
MS1 MS2 TRANSITIONS_PER_STEP connected connected 1 disconnected connected 2 connected disconnected 4 disconnected disconnected 8 Note
Both stepper motor driver boards must have the same jumper configuration.
- printerc.build_mm12_script(fpath, ntransitions=180, delay=1, servo_acceleration=0, servo_speed=100)[source]
Build a script to be loaded on the MM12.
Parameters : fpath : str-like
Path location where to save the script file.
ntransitions : int, optional
Number of low-to-high transitions to perform in the subroutines that performs translation in units of pixels through the stepper motor (default is TRANSITIONS_PER_PIXEL).
delay : int, optional
Delay (in milliseconds) between each transition in the subroutines that perform translation through the stepper motors (default is 1).
servo_acceleration : int, optional
Sets the acceleration of the servo signal channel in units of (0.25 us)/(10 ms)/(80 ms) (default is 0).
servo_speed : int, optional
Sets the speed of the servo signal channel in units of (0.25 us)/(10 ms) (default is 100).
- printerc.connect_printerm(commandport_id)[source]
Connect printerc with printerm through the MM12 command port.
Parameters : commandport_id : str or int
Serial device name or port number number of the MM12 serial command port.
- printerc.manual_translation_mode(precise=True)[source]
Manually translate the printerm tool across the
 plane.
Parameters : precise : boolean, optional
If True, perform translation in units of single low-to-high transitions sent to the stepper motor drivers (how much the tool is translated depends on the microstep format selected through the XMS1, XMS2, YMS1, YMS2 jumpers in mcircuit). If False perform translation in units of pixels (default is True).
- printerc.mm12_script_status()[source]
Indicate whether the MM12 script is running or stopped.
Returns : script_status : {MM12_SCRIPT_RUNNING, MM12_SCRIPT_STOPPED}
- printerc.prepare_img(imgpath, invert=False, show=False)[source]
Perform any necessary processing for the input image to be reproduced by printerm.
Parameters : imgpath : str-like
Path to the image file. Must be PNG, 8-bit grayscale, non-interlaced.
invert : boolean, optional
Invert the image if True (default is False).
show : boolean, optional
Show the image if True (default is False).
Notes
This function sets the following global names:
- img : array of booleans
- 2-d array representation of the image.
- b : int
- Image’s height, number of rows in the array representation.
- w : int
- Image’s width, number of columns in the array representation.
- printerc.print_image_better_better(confirm=False)[source]
Automatically print the input image.
Parameters : confirm : boolean, optional
Wait for confirmation before any translation (default is False).
Notes
Let
 be the matrix representation of the input image.
 as an element of , represents a pixel.
Comparing with the input image from a front perspective:
as an element of , represents a pixel.
Comparing with the input image from a front perspective: corresponds to the upper left corner of the input image.
 corresponds to the lower right corner of the input
image.
corresponds to the lower right corner of the input
image.
Starting from the HOME position the printerm tool visit every element of the row from
to  then moves to the next
row (
then moves to the next
row ( ) and visits every element of the row from
to
) and visits every element of the row from
to  , and so on until there are no more
rows to visit. In any position, if the corresponding pixel is black then
the tool prints it.
, and so on until there are no more
rows to visit. In any position, if the corresponding pixel is black then
the tool prints it.
- printerc.scan_serial_ports()[source]
Scan system for available physical or virtual serial ports.
Returns : available : list of tuples
Each element of the list is a (num, name) tuple with the number and name of the port.
Notes
Directly copied from example from pyserial project.
- printerc.translate(adm, confirm=False)[source]
Translate the printerm tool across the
 space.
printer73x can only perform translations across a single axis at a time.
Parameters : adm: str :
adm stands for Axis, Direction, Mode. Use the following table to select the kind of translation you want to perform (where
 is
the number of pulses for the printerm tool to translate a pixel unit
across the respective axis).
is
the number of pulses for the printerm tool to translate a pixel unit
across the respective axis).adm
translation
X-p
send 1 single pulse for negative translation across
.X+p
send 1 single pulse for positive translation across
.X-P
send
pulses for negative translation across .X+P
send
pulses for positive translation across .Y-p
send 1 single pulse for negative translation across
.Y+p
send 1 single pulse for positive translation across
.Y-P
send
pulses for negative translation across .Y+P
send
pulses for positive translation across .Z-
move the tool to the off position (
).Z+
move the tool to the on position (
).confirm: boolean, optional :
If True, the user must confirm the translation by pressing Enter (default is False).
mcircuit
printerc controls mcircuit (Main Circuit), which in turn drives the motors. mcircuit’s subsystems are MM12 and MCB.
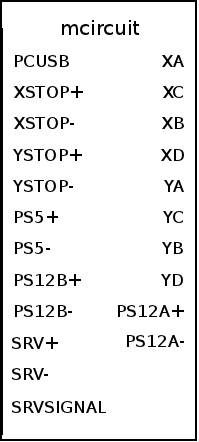
mcircuit’s connectors
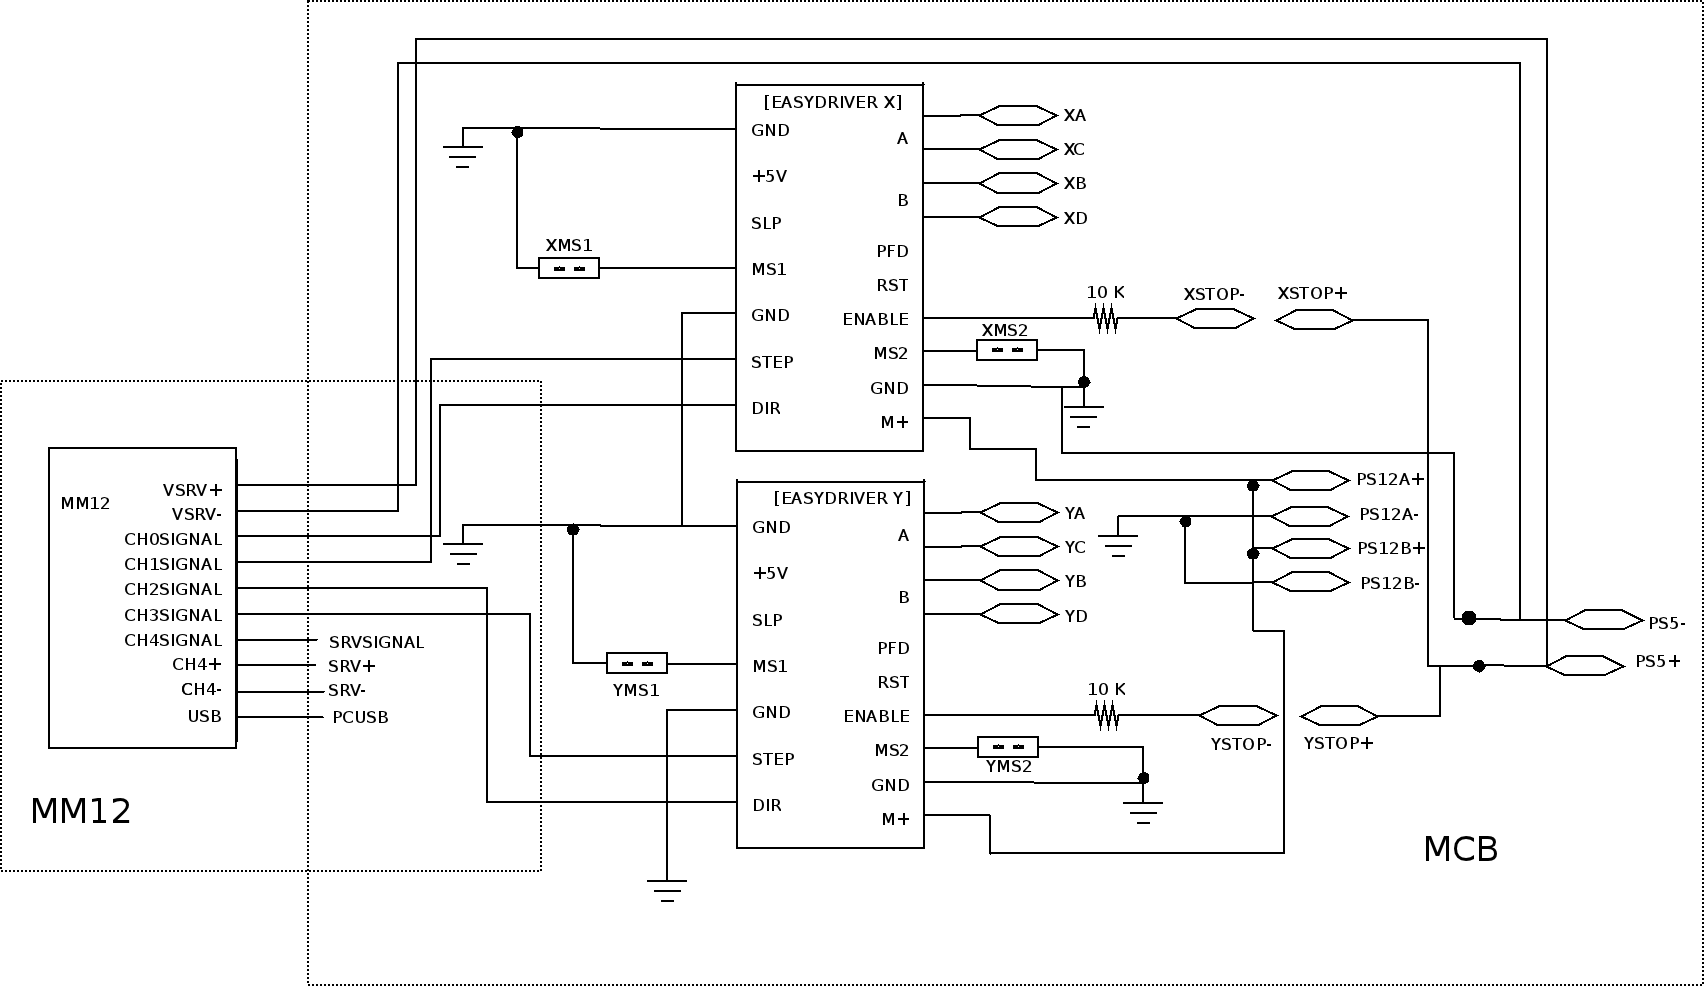
mcircuit’s schematic
MM12
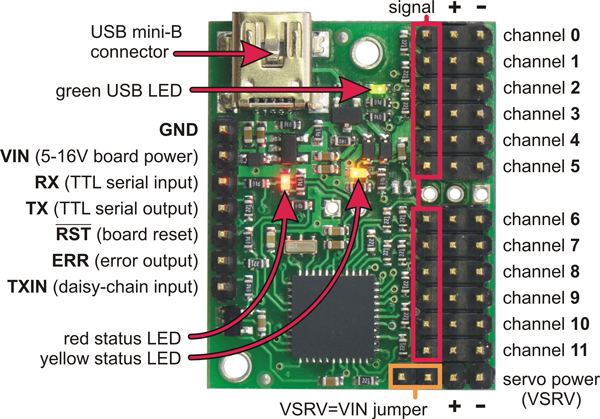
The Pololu‘s Mini Maestro 12 is an USB servo controller. Quoted from [MM12UG]:
With three control methods — USB for direct connection to a PC computer, TTL serial for use with embedded systems, and internal scripting for self-contained, host controller-free applications — and channels that can be configured as servo outputs for use with radio control (RC) servos or electronic speed controls (ESCs), digital outputs, or analog/digital inputs, the Maestro is a highly versatile servo controller and general I/O board in a highly compact package.
MM12 doesn’t do anything in its own, it only loads some subroutines in its memory which printerc calls through a serial connection stablished between MM12 and printerc. This is a master-slave architecture (printerc is master, MM12 is slave). These subroutines are basically the translations in each axis. Because of limitations in MM12, subroutines cannot execute in parallel, making axial interpolation (driving more than 1 motor at a time) impossible (see printerc.print_image_better_better()).
MM12 directly drives the servomotor, but uses MCB’s stepper motor drivers to drive the stepper motors. Again, all of this actually commanded by printerc.
Important
This pins/connectors are equivalent:
MM12.USB_port = mcircuit.PCUSB
MM12.VSRV+ = MCB.VSRV+
MM12.VSRV- = MCB.VSRV-
See section MCB
The script with the routines loaded in MM12 is:
0 4 acceleration
100 4 speed

sub x_neg_pulse
  6800 0 servo          # set direction
  5600 1 servo
  1 delay
  6800 1 servo
  1 delay
  quit

sub x_pos_pulse
  5600 0 servo          # set direction
  5600 1 servo
  1 delay
  6800 1 servo
  1 delay
  quit

sub x_neg_pixel
  10
  6800 0 servo          # set direction
  begin
    dup
    while
    5600 1 servo
    1 delay
    6800 1 servo
    1 delay
    1 minus
  repeat
  quit

sub x_pos_pixel
  10
  5600 0 servo          # set direction
  begin
    dup
    while
    5600 1 servo
    1 delay
    6800 1 servo
    1 delay
    1 minus
  repeat
  quit

sub y_neg_pulse
  5600 2 servo          # set direction
  5600 3 servo
  1 delay
  6800 3 servo
  1 delay
  quit

sub y_pos_pulse
  6800 2 servo          # set direction
  5600 3 servo
  1 delay
  6800 3 servo
  1 delay
  quit

sub y_neg_pixel
  10
  5600 2 servo          # set direction
  begin
    dup
    while
    5600 3 servo
    1 delay
    6800 3 servo
    1 delay
    1 minus
  repeat
  quit

sub y_pos_pixel
  10
  6800 2 servo          # set direction
  begin
    dup
    while
    5600 3 servo
    1 delay
    6800 3 servo
    1 delay
    1 minus
  repeat
  quit

sub z_position_off
  3760 4 servo
  begin
    get_moving_state
  while
    # wait until is is no longer moving.
  repeat
  quit

sub z_position_on
  8700 4 servo
  begin
    get_moving_state
  while
    # wait until is is no longer moving.
  repeat
  quit
MCB
Main Connection Board, supplies electrical connectors to plug the MM12, the stepper motors, the STOP button and the power supplies. MCB contains 2 EasyDrivers v4.0 [EASYDRIVERD], the stepper motors drivers. Note that the role MCB is to merely contain the stepper motors drivers, and to provide electrical connections to the rest of the system. Optionally, a general hardware STOP button can be used.
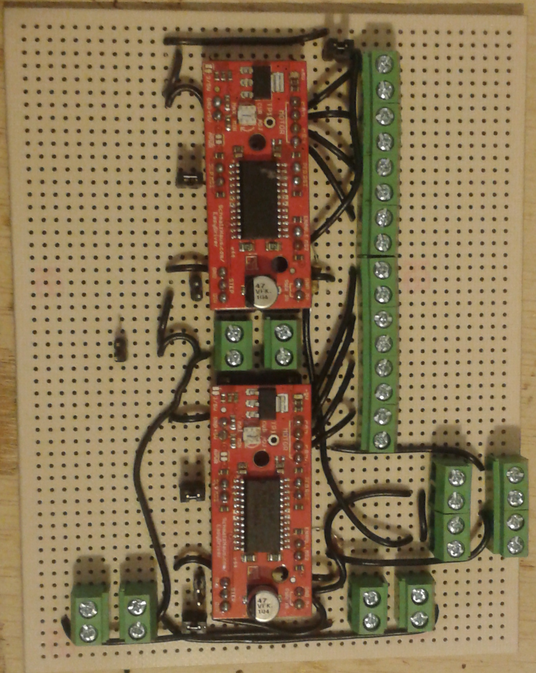
MCB’s top view.
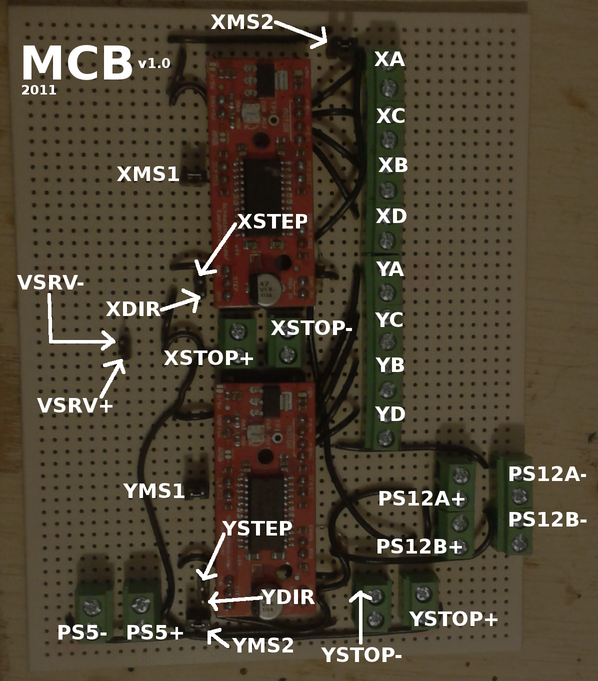
MCB’s labeled top view.
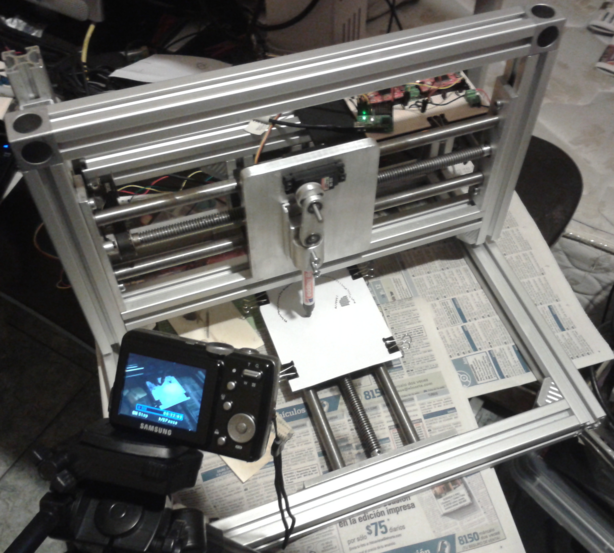
printerm
This is the physical machine, capable of motion across 3 axes. Its
machine tool is a pen which can positioned at some point in a plane
( and axes) and print a pixel moving the pen in the
axis.
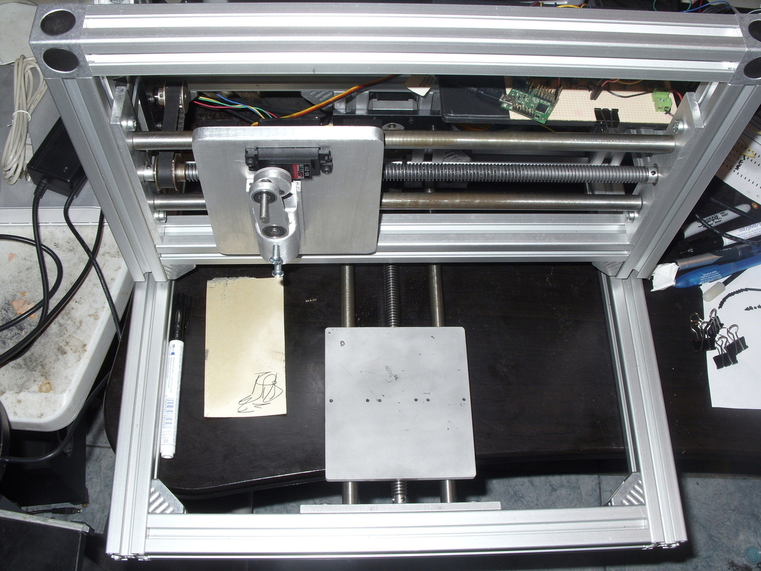
printerm
Physical Components
Symbolic names in parentheses, used throughout the document.
- 1 12 V DC power supply, 1.25 A (PS12A).
- 1 12 V DC power supply, 1 A (PS12B).
- 1 5 V DC power supply, 1 A (PS5).
- 1 Mini Maestro 12 (MM12).
- 1 main control board (MCB).
- 6 single jumper wires, 6’‘.
- 1 servomotor cable extension.
- 2 stepper motors.
- 1 servomotor.
- 1 main printer structure (printerm).
- 4 paperclips.
Installation

printer73x’s connections diagram
Install printerc dependencies:
Install Python >=2.7.1 CPython implementation.
Windows note
Download the Windows installer from here.
Install pySerial >=2.5 (See [PYSERIALD], section pySerial, subsection Installation).
Install IPython 0.10.2 (See [IPYTHOND], section Installation).
Install matplotlib >=1.0.1 (See [MPLD], section User’s Guide, subsection Installing).
Install ImageMagick >= 6.6.5.10 (See [IMGMAGD]).
Unzip the printer73x package to a directory of your choice.
If mcircuit’s subsystems (MM12 and MCB) are disconnected, refer to mcircuit’s schematic, MM12’s labeled top view. and MCB’s labeled top view. to connect them.
Plug the motors to mcircuit (refer to printer73x’s connections diagram, MCB’s labeled top view. and this important note).
Refer to printer73x’s connections diagram to plug the PS5, PS12A and PS12B power supplies to mcircuit.
Install the machine tool (pen) in the
axis slot.
Your printer73x is now installed and ready to be operated.
Operation
Follow these steps to operate the printer73x.
Power up PS12A, PS12B and PS5.
Connect your PC and mcircuit with the USB cable (see printer73x’s connections diagram).
Open a command line terminal.
Remove the alpha channel and adjust the image resolution with:
mogrify -alpha off -resize '73x100' <img_orig.png>
See ImageMagick documentation to understand better this command. The new pixel resolution must be less or equal than the maximum printing resolution of the printer, which is determined by the printing surface.
Starting from the printer73x distribution directory, change the current directory to printerc.
Run the printerc.py program:
python printerc.py
Note
If the python interpreter is not in your PATH environment variable, call it with an absolute path.
Identify the MM12 command port. When you connected mcircuit to an USB port, its shows up to your PC as 2 virtual serial ports. You should find out the device name or port number of the MM12 command port (see [MM12UG], section 5.a). To scan the serial ports on your PC do:
In [1]: scan_serial_ports()
Connect printerc and printerm executing the connect_printerm command with the command port device name or port number as argument. For example if your command port device name is COM1, then run:
In [2]: connect_printerm('COM1')
and you will get:
``printerc`` is now connected to ``printerm`` through ``COM1``Put a piece of paper on the printing surface (use the paperclips).
Enter manual translation mode to manually translate the printerm tool to the HOME position. To translate precisely but slowly run:
In [3]: manual_translation_mode(precise=True)
To perform a faster but less precise translation, run:
In [3]: manual_translation_mode(precise=False)
Because precise translation is the default, you can just run manual_translation_mode() without arguments. In manual translation mode you can translate the printerm tool across the
and axes by sending pulses to the respective
motor drivers with your keyboard. The following table relates the
key pressed to the translation pulse sent to the drivers:key pressed
axis
direction
h
-
l
+
j
+
k
-
You can only manually translate across one single axis at a time. To exit manual translation mode just press another key.
Load and process the image:
In [4]: prepare_img(<imgpath>)
Loading ``<imgpath>``...
Processing the image...
Where <imgpath> is the path to the image to print. The following variables will be set:
- img, the array representation of the image.
- b, the image’s height, number of rows in the array representation.
- w, the image’s width, number of columns in the array representation.
Start the printing process with:
In [5]: print_image()
...
and wait for the process to finish:
*printer73x* finished printing the image ``<imgpath>``where <imgpath> is the path of the image printed that you selected in step 3. The machine tool is in the HOME position.
Exit printerc:
In [6]: exit()
Do you really want to exit ([y]/n)?

Thanks for using ``printerc``!
Power down printerm:
- Unplug the USB cable.
- Unplug PS5.
- Unplug PS12B.
- Unplug PS12A.
TODO
- Improve documentation.
- Improve the controller to implement axial interpolation and to drive the motors faster.
- Merge PIMG and printerc in a single Python module, then printer73x won’t require MATLAB anymore.
- Improve printerc to implement the functionality from ImageMagick to drop that software requirement.
- Get and merge printerm documentation file with this document.
- Create a configuration file so the user can do custom configuration without modifying the source code.
- Translate to english documentation sections in spanish.
References
| [MM12UG] | (1, 2, 3) Pololu Maestro Servo Controller User’s Guide (http://www.pololu.com/docs/0J40). |
| [PYSERIALD] | pySerial 2.6 project documentation (http://pyserial.sourceforge.net/index.html). |
| [IPYTHOND] | IPython 0.10.2 project documentation (http://ipython.org/ipython-doc/rel-0.10.2/html/index.html). |
| [MPLD] | matplotlib 1.1 project documentation (http://matplotlib.sourceforge.net/contents.html). |
| [EASYDRIVERD] | EasyDriver Stepper Motor Driver. An Open Source Hardware Stepper Motor Drive Project (http://www.schmalzhaus.com/EasyDriver/). |
| [A3967D] | Microstepping Driver with Translator. Allegro MicroSystems, Inc. Datasheet (http://www.allegromicro.com/en/Products/Part_Numbers/3967/3967.pdf). |
| [IMGMAGD] | Download Binary Releases. http://www.imagemagick.org/script/binary-releases.php |